If you like to connect your HTC AT&T window phone to your computer and use mobile internet with your computer or your computer internet use with your mobile – then you must have a USB mobile cable through you connect your mobile to your computer via USB port- and then you Install window mobile device center in your computer.
window mobile device center is already install in window seven and window 8, if its not already install then you download window mobile device center from Microsoft website, if its already install then you go Start Menu, all program, accessories, and open sync center.
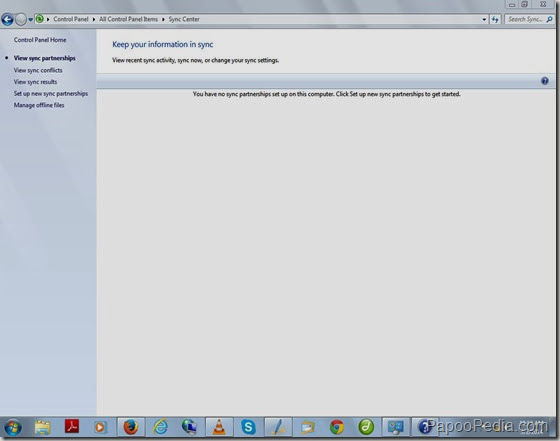
What is Sync Center?
Sync Center allows you to check the results of your recent sync activity if you've set up your computer to sync files with a network server (often called offline files). When you sync with a network server, you can access files by keeping synced copies of those files on your computer, even when the network server is unavailable. Sync Center can tell you if the files synced successfully or if there are any sync errors or warnings.
When you connect your HTC AT&T window phone to your computer- mobile device (your mobile) give you these option.
Select the type of connection to your PC.
01. active sync (sync with outlook) – enable faster data synchronization (clear check box if active sync does not recognize the device).
02. Disk drive (faster file transfer) – The storage card won't be displayed in the devices file explore when connected to a PC in disk drive mode.
03. Ask me first about USB connection type when I connect the device to the computer.
These option you select on Disk Drive when you like to transfer your memory card data to your computer – if you like to save your memory card file to your computer the you must click on disk drive. your memory card data show on your computer and you easy to copy or cut your file and paste in your computer disk.
The second option is active sync.
If you click on sync the you mobile will synchronization with your computer and you easy sync your contact, messages, music and picture sync with your computer or with outlook account.
Sync music, pictures, contacts, and calendars with a mobile device
There are two ways to sync a mobile phone, portable music player, or other mobile device with your computer. You can install the sync software that many manufacturers include with their devices, or you can use the new Device Stage feature in this version of Windows if your device supports this feature.
Device Stage lets you sync music, contacts, calendars, and other files and information with a compatible mobile device. It also allows you to perform other device-related tasks that vary depending on the device, such as creating ringtones for a mobile phone. What files and information you can sync depends on the type of device you have and what it supports. For example, you may be able to sync contacts and calendars with a smartphone, but not with a portable music player.
To see which types of files and information you can sync with your device, connect the device to your computer. If your device is compatible with Device Stage, this feature will open automatically. (If you've already set up your device to sync, Device Stage will open, but it will appear minimized on your Windows taskbar.) Device Stage will list various tasks you can perform with your device, including sync setup.
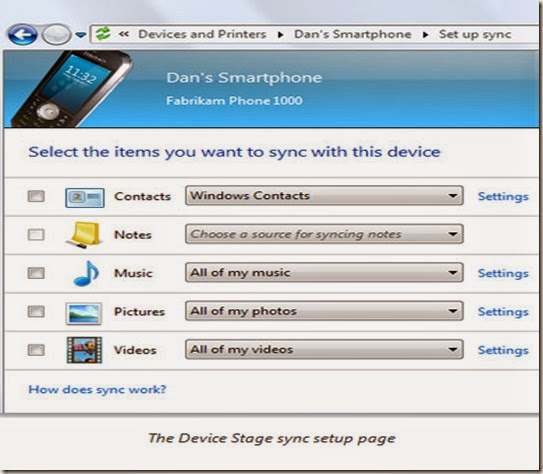
To set up your computer to sync contacts, calendars, tasks, or notes with a mobile device
Device Stage has different options for syncing contacts, calendars, tasks, and notes than it does for syncing music, pictures, and videos.
-
Turn on a compatible smartphone or other mobile device that has the ability to work with contacts, calendars, tasks, or notes. Connect it to your computer using a USB or other connection cable; or, if it's a wireless device, connect wirelessly.
If Device Stage doesn't open, your device either doesn't support this feature of Windows or it isn't properly connected to your computer.
-
In Device Stage, double-click Set up sync.
-
Select the check box for each type of file or information you want to sync (contacts, calendars, notes, or tasks).
-
For each type of content you selected, click the drop-down list and select what program to use as the source for your contacts, calendars, notes, or tasks. If you don't see the program you want listed, click Get more sync plug-ins. This will take you to a page where you can download sync plugs-ins for other programs.
-
To sync all your contacts, calendars, notes, or tasks to your device, click Sync now. They'll all sync immediately, and again automatically in the future, when your device is connected to your computer. To save these changes and sync automatically in the future (but not now), click Save changes.
-
If you want, you can determine how Windows syncs your contacts, calendars, notes, or tasks. Click Settings and then follow the instructions. When you're done changing these settings, click OK to return to the sync settings page and then click Save changes or Sync now.
To set up your computer to sync music, pictures, or videos with a mobile device
Device Stage has different options for syncing music, pictures, and videos than it does for syncing contacts, calendars, tasks, and notes.
-
Turn on a compatible music player or other mobile device that's able to store music, pictures, or videos. Connect it to your computer using a USB or other cable connection; or, if it's a wireless device, connect wirelessly.
-
In Device Stage, double-click Set up sync.
-
Select the check box for each type of file or information you want to sync (music, photos, or videos).
-
To sync all the music, pictures, or videos in your Windows libraries, select Sync now. This will begin syncing them immediately and also sync them automatically in the future, when your device is connected to your computer. To save these changes and sync automatically in the future (but not now), click Save changes.
-
If you want, you can choose what music, pictures, or videos to sync to your device. Click Settings and then follow the instructions.
The information at the bottom of the sync settings page shows how much space you've used on your device, how much free (available) space is left on the device, and how much space is required to sync all the music, photos, or videos you've selected. Because music, photos, and videos can take up large amounts of space, it's a good idea to check how much available space is on your device when deciding what to sync.
-
After you're done selecting what music, photos, and videos to sync, click OK to return to the sync settings page and then click Save changes or Sync now.
To check if your mobile device is connected to your computer
Any mobile device successfully connected to your computer should appear in Devices and Printers in Control Panel, whether the device is connected with a cable or wirelessly. The device should appear here even if it's not compatible with Device Stage.
-
Click to open Devices and Printers.
-
Look for your device. If the device is connected properly, its name should appear in Devices and Printers. It might be listed under a different (and sometimes not obviously related) name than the make and model of the device. If you haven't changed the name of a device in Windows, Devices and Printers will display whatever name the manufacturer gave the device.
-
If you see your device in Devices and Printers, but it doesn't automatically open Device Stage when you connect it to your computer, then the device isn't compatible with Device Stage. It should automatically open AutoPlay instead.
-
After you've set up your device to sync with Device Stage, the next time you connect the device to your computer, Device Stage will open automatically, but it will be collapsed on the Windows taskbar. To change your sync settings, click the device icon on the taskbar to open Device Stage.
How sync works
After you’ve set up your device to sync, Windows automatically syncs files with the device any time you connect it to your computer. If you leave the device connected for a long time, Windows checks for new contacts, calendars, and similar types of files to sync approximately every 30 minutes. Windows also checks for new music, pictures, and videos that you have set up to sync, but only when you connect the device or click Sync Now in Device Stage.
If your device is set up to sync automatically, this can drain the battery quicker than if sync is turned off. If it seems like Windows is taking a long time to sync some files, it might be due to the types of files it's syncing. For example, video files can be quite large and take much longer to sync than music or photos.
If you’re about to sync many files—such as your entire music collection—with a new device, it might take a long time. After you’ve finished syncing the files once, however, Windows will only sync new files next time, which should be a lot quicker.
Sync with a wireless device
Windows can sync with compatible mobile devices that you connect wirelessly to your computer. Many mobile phones connect using Bluetooth wireless technology. Syncing a Bluetooth enabled device wirelessly can be much slower than syncing a device connected by a cable. If syncing is taking too long, try connecting the device to your computer using a USB cable or whatever wired connection the device supports, if any.
Some wireless devices use Wireless USB or Wi‑Fi connections. These are typically faster than Bluetooth connections. For more information about connecting a wireless device.

